SAFE ECLIPSE VIEWING: THE PIN-HOLE
If seeing the sun directly will damage our eyes, how then will we see the solar eclipse? We will now look at three categories of methods by which we can enjoy the eclipse completely safely. The first relies on the pin-hole method and is best suited to be done at home, with very little equipment and only limited by your imagination. The second method relies on seeing the projected image of the sun using a telescope or binoculars. The third set of methods rely on special material that block almost all of the sunlight, but it is difficult for almost anyone to get hold of them. Let us look at each of these now, and choose which ones we can use for ourselves.
For centuries, we have known that a pin-hole creates an upside down image of a far away object. We might have constructed a pin-hole box in our school days and looked at trees and even our friends being imaged upside down. The same principle can be used for imaging the sun during the eclipse as well. Making such a pin-hole box is extremely easy and we can do this at home today. We need to make pin-hole on a sheet of paper or cardboard, hold it against the sun, and an image of the sun will be formed on the other side. That sounds easy, but your cleverness comes in choosing the kind of pin-hole, the screen, the box etc. Let us look at a few possibilities.
These methods for seeing the eclipse can be followed by individuals by themselves, which is essential during the Covid-19 pandemic. However, there are many simple hands-on activities that can be done at almost no cost by families and people living together. Many such activities have been put together in a booklet, called ‘Suryotsav’ or ‘Sun Festival’ by Navnirmiti Learning Foundation, India, which can be downloaded here.

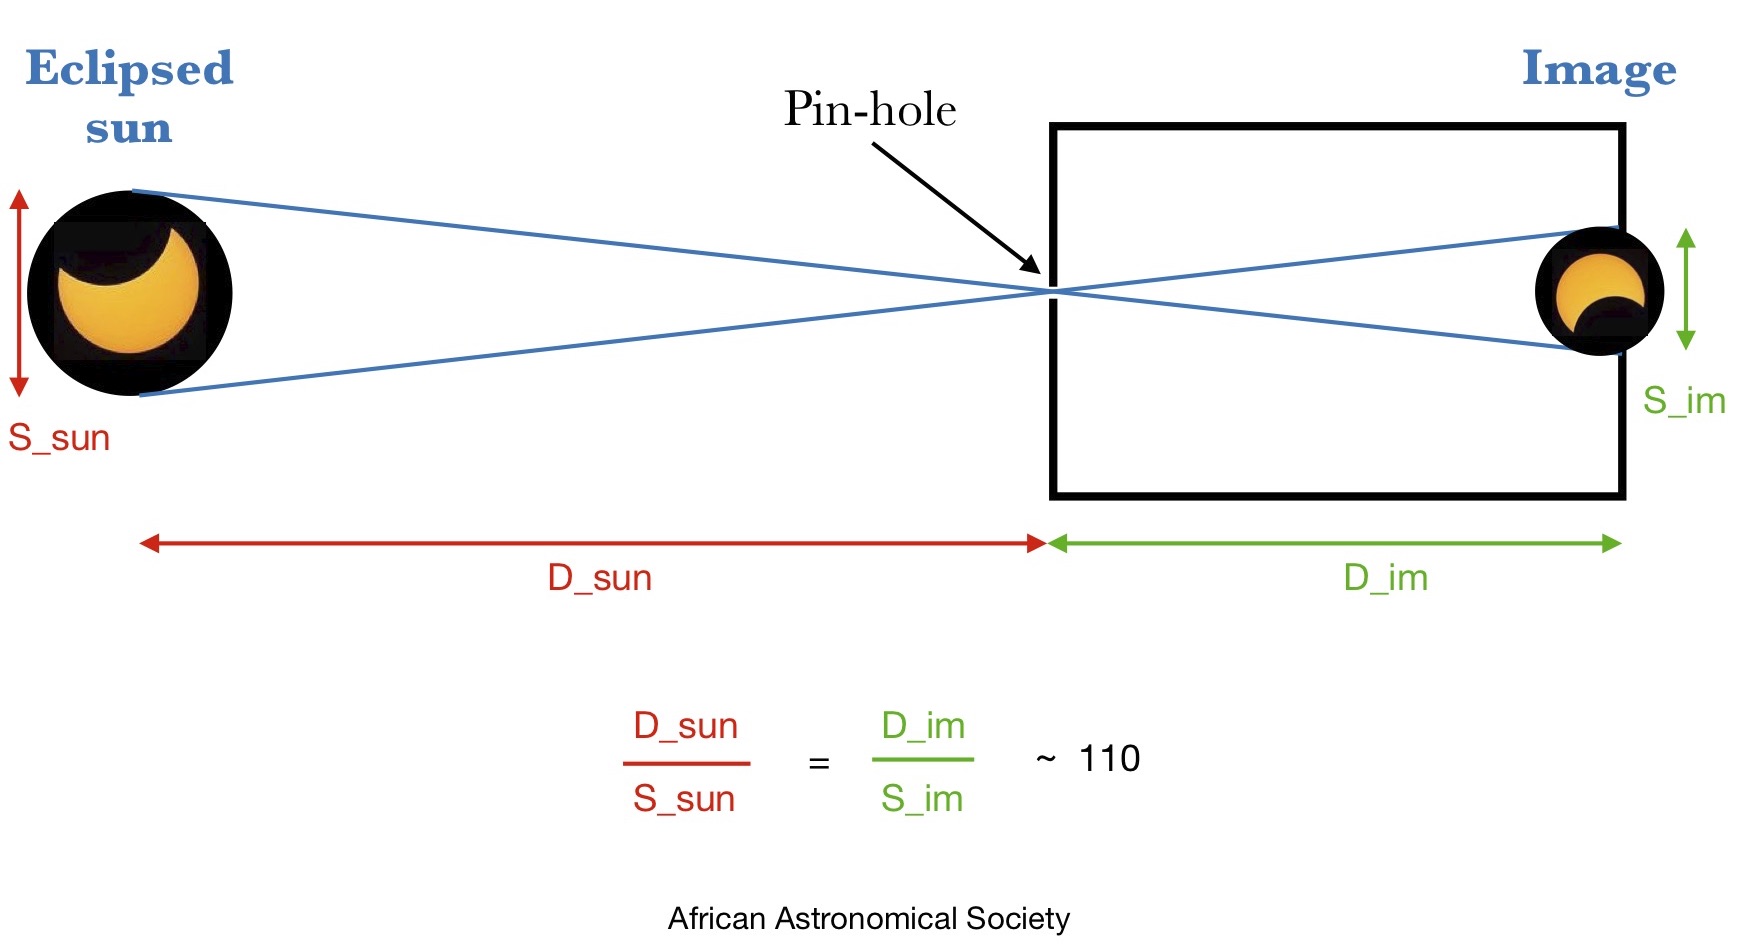
First, note that the ratio between the distance of the object to the pin-hole and the size of the object is the same for that of the image. Since we know the size of the sun and its distance from us, we know that this ratio is around 110. Taking this as 100 for now, this means that if we want an image of the sun to be 1 cm in size, the screen needs to be 100 cm or 1 metre from the pin-hole. If we want a much bigger image that is 10 cm in size, the screen needs to be 10 metres away from the pin-hole. Hence, moving the screen farther away from the pin-hole is better.
On any clear day, you can try and project a large image of the sun using one of the methods described below. You can measure D_im and S_im yourself with a measuring tape and ruler. Knowing that the sun is 150 million km away from us, you can then calculate the diameter of the sun from your own experiment! Isn’t that fun?
However, the brightness and hence the contrast of the image will be reduced if ambient light falls on the screen. Shielding the screen to reduce ambient sunlight by enclosing it in a box will create a better image. Note that the surface with the pin-hole itself will cast a shadow on the screen, providing some shielding. But we cannot create a 10 m sized box to produce a 10 cm sized image. What are the possible solutions?
The last thing to consider is how big the pin-hole should be. Smaller pin-holes will create sharper images. However, they will also create fainter images. In addition, if the hole is too big, then you need to move the screen farther back to make it act like a pin-hole and create an image of the sun. Else, all you will see is the shadow of the hole itself! You will need to experiment with various sizes in the days before the eclipse, which are suited to the distance to your screen. Given these three considerations, here are some practical examples that have been used extensively in previous eclipses around the world. Can you think of other ways too? Let us know!
